Messaging

Viewing Messages

Portal Administrators can view your Portal messages in the Messages Inbox as follows, so long as you have given yourself the necessary permissions. Additionally, if you are a Portal User you can view your Portal messages in the Messages Inbox as follows, so long as your Portal Administrator has given yourself the necessary permissions:

  1. Click "Messages" in the navigation menu to view your received Portal messages. Any unread messages will display in bold font in the message list.
  2. Click the "Sent" tab to see sent messages.
  3. In both lists messages are sorted by date descending (most recent first) with headings including message sender, recipients, subject, date sent, context and origin (only for received messages).
    Message List
  4. Click a message to view the following details for a Portal message in your Inbox or Sent lists:

    From

    Name of the user sending the message, can be a Portal user or a Central Bank of Ireland team

    To

    Name(s) of the message recipients – can be one or more other Portal users or Central Bank of Ireland teams

    Subject

    Subject of the message

    Classification

    I assigned to the message by Central Bank of Ireland

    Context

    Related to the Portal activity associated with the message (for example a Request Change), if appropriate. Click the link to navigate to the relevant Portal activity

    (Message body)

    The body of the message

    Attachments

    A link to each document attached to the message (if any)

    Click the link to open a Central Bank of Ireland copy of the document.

  5. You can reply to or forward a message when viewing it. See How do I respond to a Portal message?
  6. Each time you open a message, you will see a "Mark Unread" button. Click this button to return to the Inbox and leave the message to appear as unread (that is, it will appear in bold font in the list). Note that this action is logged by the system.
  7. Click the "X" button in the top right corner to close a message.

Some additional things to note:

  • If you cannot see the "Messages" link in the navigation contact your Portal Administrator. See How do I request a change to my permissions?
  • If you have the permission level you will also be able to access other users’ messages. See How do I view messages sent or received by other users in my institution?
  • By default five messages will display. You can increase the number displayed by clicking the dropdown number of Entries above the list.
  • You can move through the pages of message entries using the controls in the bottom right-hand corner of the messages screen, by:
    • clicking on individual page numbers;
    • clicking the next/previous page buttons; or
    • clicking the First or Last buttons.
      Paging
  • To sort a message list by any of the column headers in the message lists click on the column header title.
  • You can also filter messages by date range or text search, see How do I search my messages?

Portal messages might not be visible to you due to permissions granted.

Note:

  • Your Portal Administrator controls who can and cannot see messages sent by your institution and received from the Central Bank of Ireland, so you might not have the right permissions. See How do I request a change to my permissions?
  • Assuming you have permissions to see Portal messages they will be in the context of the institution shown at the top of the Portal page. If you are linked to more than one institution (e.g. in a Delegated capacity) you will only be able to see the messages related to the selected institution in the dropdown list at the top of the Portal page.
  • It is possible to see sent or received messages for other users in your institution. See How do I view sent or received messages for other users in my institution? This is also dependent on having the right permissions from your Portal Administrator.
  • If your link to an institution is removed by that institution’s Portal Administrator, you will no longer be able to see messages you sent and received in the context of that institution.
  • If you cannot see your institution’s messages once you’ve logged into the Central Bank of Ireland Portal you can request your Portal Administrator to change your permissions via the "My Profile" > "My Permissions" menu option. See How do I request a change to my permissions?

There are two indicators of unread messages.

  1. A red badge beside the "Messages" menu item in the left navigation - The number on the badge shows all the unread messages for your selected institution. If there are no unread message the badge will not display.
    Messages Indicator Nav
  2. A red badge beside the "notification bell" in the page header - The number shown in the badge is the total of unread messages plus pending actions for all institution's to which you are linked
    Messages Indicator Bell
    1. Click the bell icon to see the number of messages and/or pending actions per institution.
    2. Click on the blue text to navigate directly to the message/action.

You can view Sent messages as follows, so long as your Portal Administrator has given you the necessary permissions:

  1. Click "Messages" in the navigation menu to view messages Inbox.
  2. Click the "Sent" tab to see sent messages.
  3. Click on a row in the list to open a sent message for reading.
    Message Sent List Open Message

See also How do I view Portal messages? for additional information on this topic.

By default you cannot see messages sent or received by other users in your institution.

Your Portal Administrator can grant you access to view all messages to and from your Institution regardless of original recipient or sender. See How do I request a change to my permissions?

If you have the relevant permissions you will see a "User" selection dropdown list, above the Inbox and Sent tabs:
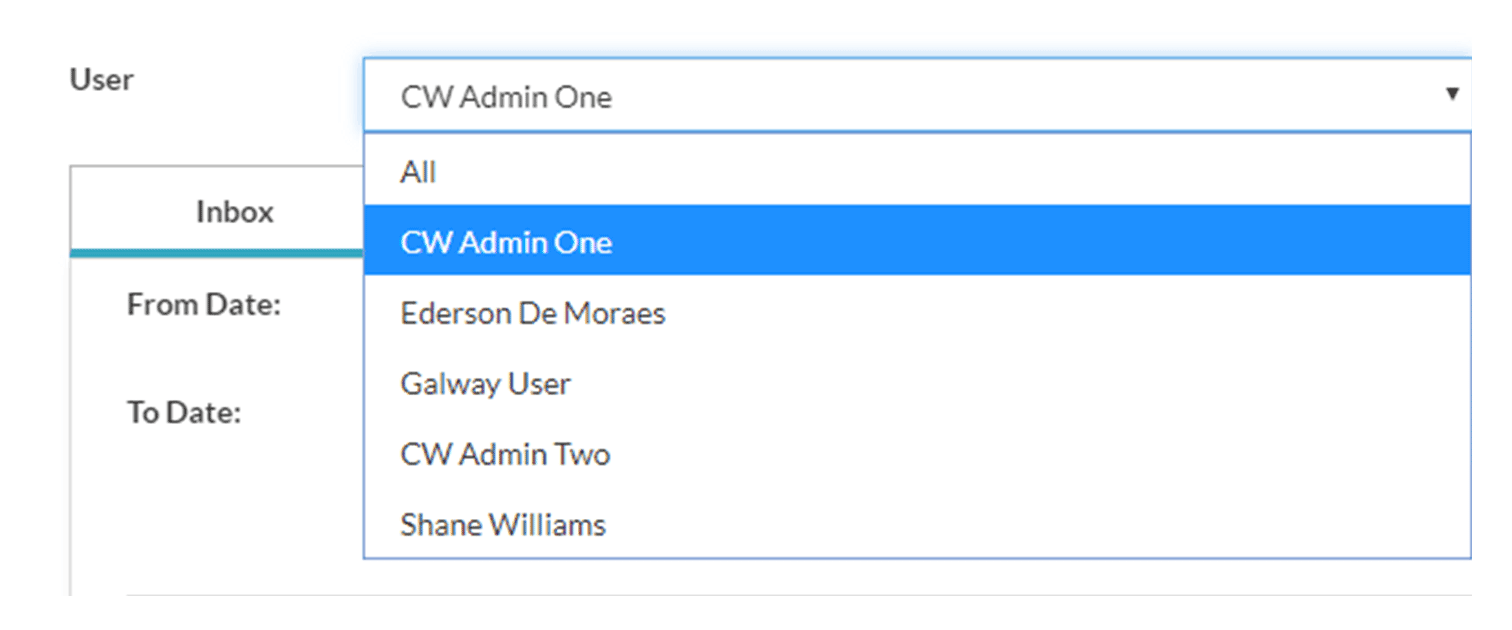
User Dropdown

This dropdown menu has the following features:

  • The default value will be your user name.
  • Select "All" to display messages from all the users in the Institution, including Delegate Users.
  • Select a single User to display messages for just that user.
  • Select a User who is a Delegate to display messages sent to or from this and other Delegate Users, in the context of your institution. See What is meant by Delegation in the Portal?

Where a Delegate user has been selected the Institution Name of the delegate institution will be displayed in the "From" or "To" fields.

Once any of the above user selections have been made the filter will apply if you click to view messages in both the Inbox and Sent message tabs.

If you leave the messages page then return the dropdown selection will revert to your user name.

There are two reasons why you might be seeing another user’s sent messages in the Message menu "Sent" tab.

  1. You have been granted "Institution level" message permissions. This is provided in circumstances where an institution needs to access correspondence sent/received by a Portal user who may not be available to provide it directly. It is not expected to be granted for normal operational Portal use but if needed can be granted by your Portal Administrator. See How do I request a change to my permissions?
  2. You have been granted permissions to act as a delegate for another institution. When you are looking at messages in the context of that other institution, you will see all messages sent by any other users who also have permission to act as delegates for that institution.

You can save and open documents attached to received and sent messages.

  1. From the left navigation menu select "Messages" then either "Inbox" or "Sent".
  2. Select a message with an attached document
  3. Click the document hyperlink at the foot of the message. You will be prompted to save the document to a local folder
  4. If needed you can open the document from the local folder, assuming you have a suitable application installed.
    Access Attachment

Note:

  • Documents attached to messages can only be viewed/downloaded. They cannot be deleted or edited directly on the message itself.

When the Central Bank sends you a message the sender may choose to track that the message has been read.

If this is the case, when you open the message a pop-up will display with the text “The sender has requested that you acknowledge this message”.
Acknowledgement

Click "OK" to close the pop-up and continue working with the message. The Central Bank of Ireland team that sent you the message will receive a receipt confirming that you have read the message.

Sending Messages

Recipients of a message are entered in the "To" field of a Portal Message.

  • If you know the name(s) of recipients (Portal user and/or Central Bank of Ireland team): type the name directly into the field, a list of possible options that match your input will start to display as you type. Either select from that list or type the name in full. Add additional recipients in the same way.
    Recipients
  • If you don’t know the name(s) of recipients (Portal user and/or Central Bank of Ireland team):
    • Click the "To…" button on the message screen. This will open the message address book in a new window.
    • Click either "Portal users" or "Central Bank of Ireland teams" depending on who you wish to receive the message.

      Note: The "Activity" column is a guide to identify the appropriate team depending on the purpose of your message. Activities relevant to your institution's authorisation(s) will be listed.

    • Click the relevant row to add the recipient to the message. You can add multiple recipients, who can be both Portal user(s) and Central Bank of Ireland team(s).
    • Click "OK" to close the address book window. The "To" field of the message will be populated with the selected recipients.

Recipients Select

To remove a recipient click the ‘x’ to the right of the name in the ‘To’ field.

Recipients Remove

Note: You can forward a message from a Central Bank of Ireland team to another Portal user if you do not edit the content of the message or add/remove document attachments. If you edit the content of the message or add/remove any document attachments you must add at least one Central Bank of Ireland team as a recipient of the message.

If the message relates to a Request Change or its associated Pending Action the ‘To’ field will be automatically populated with the name of the Central Bank of Ireland team relevant to the Request Change.

You can create a Portal message in the following ways:

  1. By replying to a message received from the Central Bank. See How do I respond to a Portal message?
  2. In relation to a Request Change. See How do I view/reply to messages in the context of a Request Change?
  3. In relation to a Pending action associated with a Request change. See How do I send a message in the context of a Pending Action?
  4. In relation to a request to your Portal Administrator to update your permissions. See How do I send a message in the context of a request to change my permissions?

For the initial release of the Portal it will only be possible to create a message in the above circumstances.

You can send a message to a colleague who has access to Portal messages for your institution by including them as a recipient in the following situations:

  1. By replying to a message received from the Central Bank. See How do I respond to a Portal message?
  2. In relation to a Request Change. See How do I view/reply to messages in the context of a Request Change?
  3. In relation to a Pending action associated with a Request change. See How do I send a message in the context of a Pending Action?
  4. In relation to a request to your Portal Administrator to update your permissions. See How do I request a change to my permissions?

For the initial release of the Portal it will only be possible to send a message in the above circumstances.

You cannot send a Portal message to an external email address. But it is possible to save it to a local folder and share a copy of the message. See How can I save a copy of a Portal message to a local folder? However this introduces information security risks, which can be avoided by using the Portal.

When you create a message you can attach document as follows:

  1. From within the message screen click the "Add Document" button. This will open an "Upload Document" window, allowing you to select the document you wish to attach from your local file system. Only certain document types are supported. See What type of documents can I attach to a Request Change or message?
    Add Document
  2. Navigate to select the document you wish to attach and click "OK".
  3. Attached documents are displayed as a hyperlink in the attachments section of the message. They can be removed by clicking the red “X” icon displayed beside the uploaded document.

Note:

  • If you need to change the content of a document attachment you should remove, update and attach the revised version.
  • Once a message has been sent an attached document cannot be removed.

You can attach any of the following document types as attachments to a message.

  • MS Office documents: .docx (Word), .xlsx (Excel), .pptx (PowerPoint)
  • Portable Document Format files: .pdf
  • Text files: .txt, .csv, .xml, .xbrl
  • Image files: .jpg, .jpeg, .tif, .tiff, .gif, .bmp, .png
  • Archive files: .zip

Password protected document attachments are permitted.

The maximum single document attachment size permitted is 30MB.

The maximum combined document attachments to a single message is 100MB.

Responding to Messages

You will receive an email to your registered email address containing a link to each new message received from the Central Bank via the Portal.

Click this link to view the Portal message. If you are not already logged into the Portal you will be prompted to enter your Portal credentials.

See How can I view the number of my unread messages for visual indicators for new messages received.

You can reply to or forward a message when viewing it. Click "Messages" in the navigation menu to view your Inbox. Click the "Sent" tab to see Sent messages.

  1. Click a message in the selected list to see the message details.
    Message Screen Respond
  2. Assuming the Central Bank of Ireland team sending the message has set it to permit a response you will see buttons marked "Forward", "Reply" and "Reply All". Note that it may not be possible to respond to a message. See Why do messages differ in capacity for response?
  3. The recipients and the subject will differ depending on which button you click:

    ‘Forward’

    The Recipient field will be empty.

    Subject field will be re-used, with an automatically applied ‘FW:’ prefix.

    ‘Reply’

    Recipient field will auto-populate with the sender of the original message.

    Subject field will be re-used, with an automatically applied "RE:" prefix.

    ‘Reply All’

    Recipient field will auto-populate with the sender plus the recipients of the original message.

  4. Complete all editable fields on the message, including the recipients. See How do I add recipients to a message?, subject and message body text. Note that the previous message will be included preceded by a header with details of the previous message recipients, subject and date sent.
  5. Apply formatting if needed using the formatting toolbar (bold, italics, bullets and so on).
  6. You can optionally add document attachment(s). See How do I attach documents to a Message?
  7. Click "Send" to send the message or click the "X" in the top right corner to close the dialog box without sending.
    Message Screen

Note the following which apply when you Reply to or Forward a message:

  • If no changes are made to Subject, Message Body, or Attachments no Central Bank recipient is required.
  • If the Subject, Message Body, or Attachments are changed, a minimum of one Central Bank recipient is required and sending of the message will be prevented.
  • You can only reply or send messages to other Portal users in your institution and Central Bank Teams.

Whenever the Central Bank of Ireland sends a message we may decide that a reply is not required or permitted. See Why do messages differ in capacity for response?

For this reason, when you open a message the "Reply", "Reply All" and "Forward" buttons may not be displayed.

  • Standard message options
    Messages Response Options All
  • Message where reply not required or permitted
    Messages Response Options None

When the Central Bank of Ireland sends you a message the default setting is that you will be able to respond, but it will not be required.

We may also specifically choose to mandate a reply or remove your ability to respond.

Below is the full list of message response options that may apply to messages you receive from the Central Bank of Ireland:

  • Standard – The default setting. Response buttons will be visible.
  • Reply required – We are requesting a response. When you select the message a notification will display saying "The message sender has requested a response to this message". This message will also be displayed in red at the top of the message. Response buttons will be visible.
  • Display on Screen - The message will appear as a notification when received and then display on your institution’s home page for a period defined when the message is sent. The message will also be in your message Inbox. Response buttons will be visible.
  • Acknowledgement Required – The first time you open the message a notification will be displayed, "The sender has requested that you acknowledge this message" with an "OK" button. Clicking "OK" will send a receipt to the Central Bank of Ireland team that sent you the message, confirming that you have read the message. Response buttons will be visible.
  • Reply not permitted - We do not allow a response to the message. Response buttons will not be visible.

Other Message Functions

You can download a copy of a Portal message to a local folder as follows:

  1. Click "Messages" in the navigation menu to view Portal messages you’ve received. Click the "Sent" tab to see Sent messages if needed.
  2. Click on a message that you wish to save.
  3. Click the "Save as File" button. The email will be downloaded in PDF format to your default download folder. You will need an application capable of reading PDF files to view the file.
Save message

There are two ways to search your institution’s messages:

  1. Global search:
    1. Type text into the global search box in the portal header and click the search icon.
    2. Search results will include a list of messages in which the text has been found. Other items matching the search, such as Actions, will also be listed.
    3. Click on a message link to see the full detail of the message
      Global Search
  2. Message Inbox and Sent tabs: Click the "Message" menu to display the "Inbox" tab.
    1. To filter by text:
      • Type the search text into the filter box above the list of messages and click the search icon.
      • The list will be filtered to display messages where the search text is found.
    2. To filter by date:
      • Type a "From Date" and/or a "To Date" in the relevant search fields.
      • The list of messages will be filtered to display messages where the "Sent On" date is within the range of date(s) entered.
        Messages Search Text and Date

Note:

  • You can use the same approach to filter messages viewable from the "Sent" tab.
  • By default the messages displayed are limited to items you have sent and received in the context of this institution. You can see messages sent or received by other users in your institution by clicking the "User" drop-down at the top of the tab and selecting either "All" or a specific user’s name.

Contact Us